Web
API Examples :
File--> new project select Web API the create the structure of application.
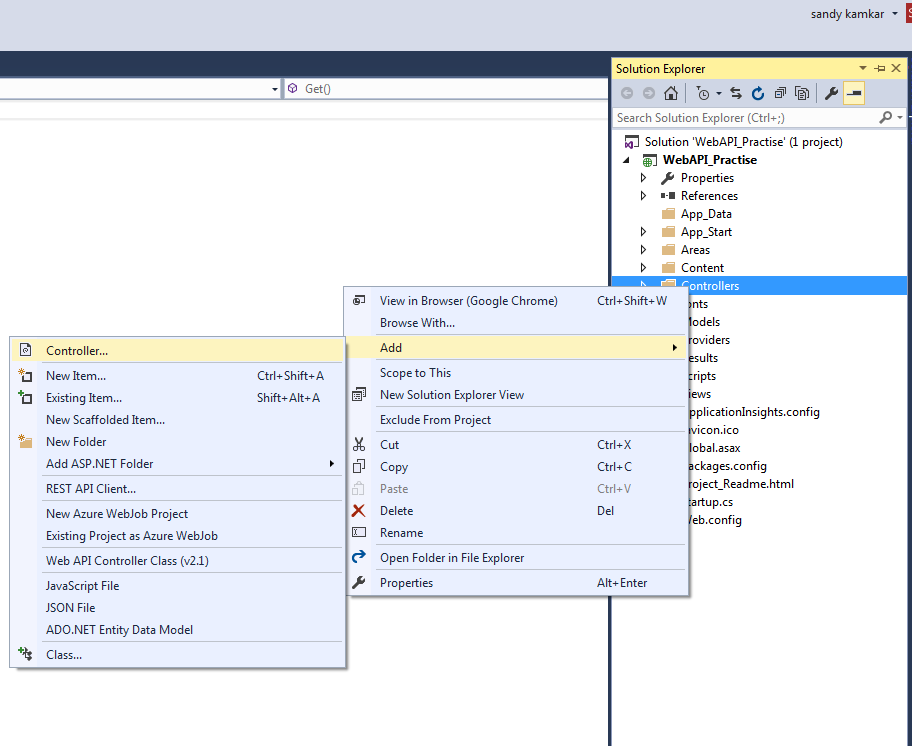
Then
add new controller shown below screen.
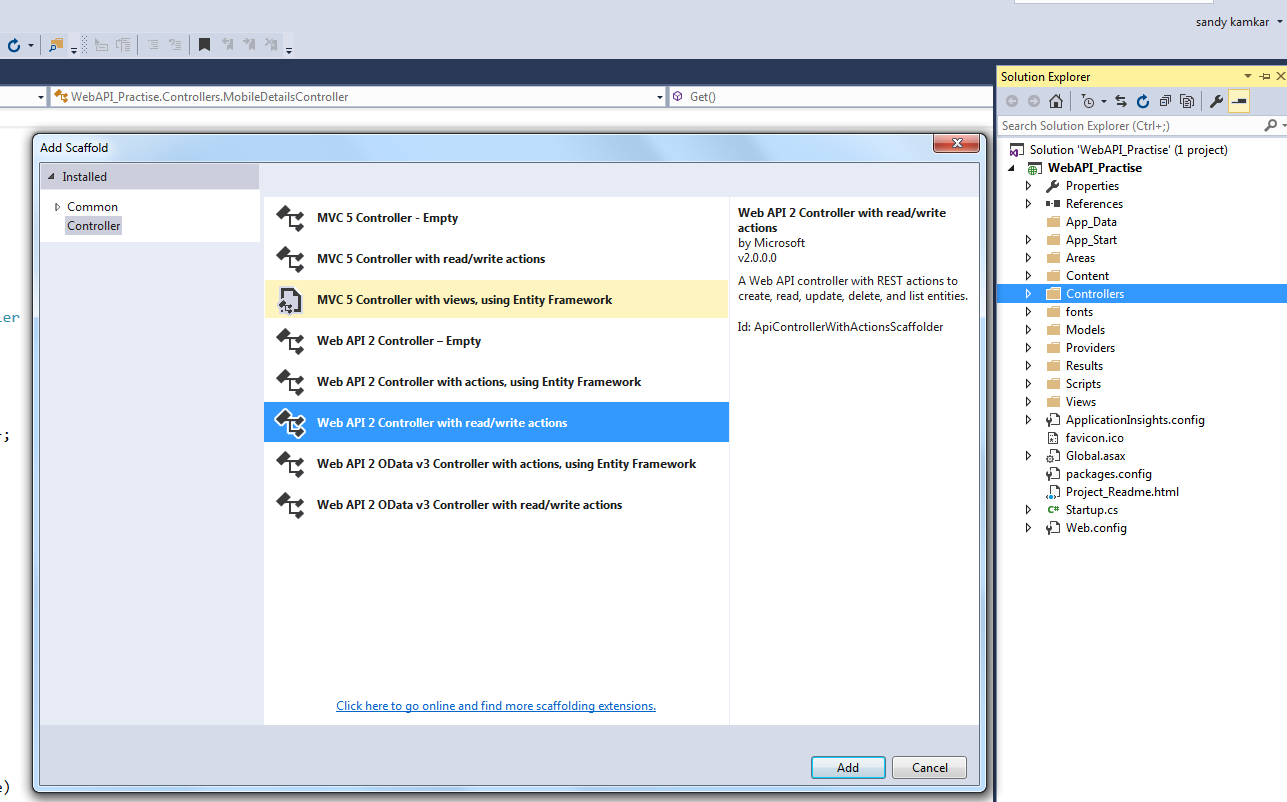
Then
open the window Add Scaffold the select the Web API 2 Controller with
read/write actions. Shown in the below screen.
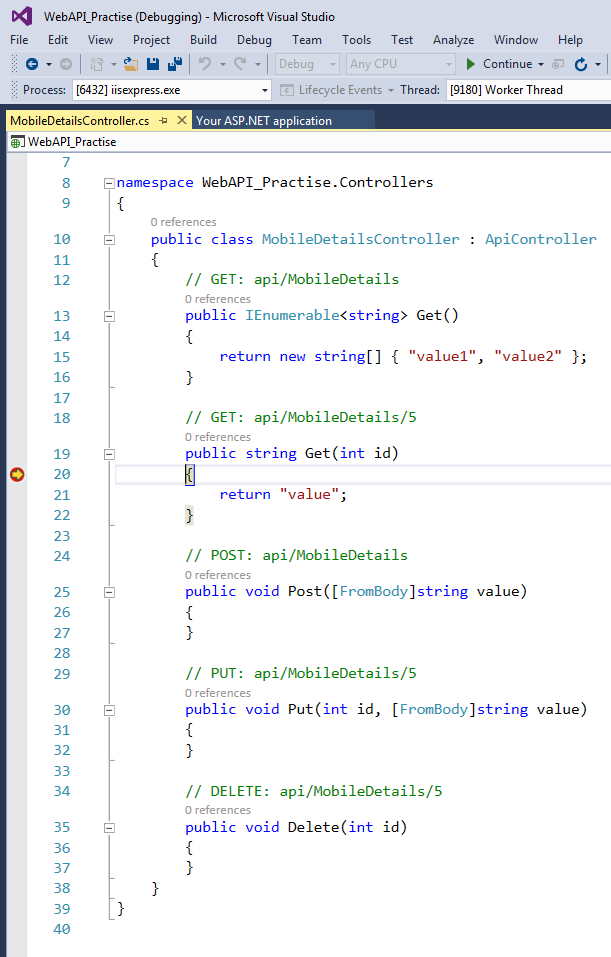
After adding the Controller you will see the code as in the following snapshot.

You
have successfully added a Web API controller to your application.
Now
you can run the application and test it.
It's
easy to configure it as a Web API.
The ASP.Net MVC and ASP.Net Web API makes heavy use of convention for configuration to Lighten the work load for creating the services.
For example, add a decorating method with attributes to make it easy to do CRUD operations.
Else it will make it difficult to understand and code.
The ASP.Net MVC and ASP.Net Web API makes heavy use of convention for configuration to Lighten the work load for creating the services.
For example, add a decorating method with attributes to make it easy to do CRUD operations.
Else it will make it difficult to understand and code.
- GET (Read)
Retrieves the representation of the resource.
- PUT(Update)
Update an existing resource.
- POST (Create)
Create new resource.
- DELETE (Delete)
Delete an existing resource.
1. Let's start by adding a Model.
To add the model right-click on the model folder and add a class with the name Mobile Stock.

2. After adding the model properties now I will consume the HTTP service developed using the ASP.NET Web API in a simple CSHTML page with JQuery and Ajax.
3. For that in the View folder I will add a folder named Mobile and inside that folder will add a Mobile Stock named view. To add it just right-click on the View folder and select View.

After adding the view you will get a blank view because we are not using any tightly coupled model here.
4. Then add a Controller with the name MobileController. Call this view Mobilestock for the demo of consuming the Web API.In this I called the view Mobile Stock.

After adding the Controller and View now let us move back towards the Web API and make some changes that we have already created with the name “MobileDetailsController”.
Let's get to the first method in MobileDetailsController.

This method is used to get a list of data.
In this method I have used the Model MobileStock and created a list of MobileStock “List<MobileStock>“.
And returning it.
GET by id

In this GET method you can retrieve records for the database by passing an id.
- POST

In this POST method you can post data (CREATE) to the database. In
this I am using the Carstock model to post the data.

- PUT

In this PUT method you can UPDATE the data (UPDATE) to the
database. I am using the Carstock model to update the data.

- DELETE

In this DELETE method you can delete data (DELETE) from the
database. I am using an id to delete the data.
Here is a snapshot of all the methods and models after adding the attributes to it.

Now let's move to the view and do CRUD operations from there.
For getting a list of data I have created a function in jQuery.

Here is a snapshot of all the methods and models after adding the attributes to it.

Now let's move to the view and do CRUD operations from there.
For getting a list of data I have created a function in jQuery.
- Calling GET IEnumerable List from Ajax and getting data from the Web API.
function
AllmobileDetails() {
$.ajax({
type:
"GET",
url:
"http://localhost:56151/api/Mobiledetails",
//URI
dataType:
"json",
success:
function
(data) {
debugger;
var
datadatavalue = data;
var
myJsonObject = datavalue;
contentType:
"application/json";
$.each(myJsonObject,
function
(i, mobj) {
$("#Mobiletbl").append('<tr><td
width="50px">'
+ mobj.MobileName +
'</td><td
width="50px">'
+ mobj.MobileModel +
'</td><td
width="50px">'
+ mobj.MobilePrice +
'</td>'
+ '</td><td
width="50px">'
+
mobj.MobileColor + '</td></tr>');
});
},
error:
function
(xhr) {
alert(xhr.responseText);
}
});
}
Calling
PostMobile Method using Ajax and posting data to the Web API.
function
PostData() {
var
mobiledetails =
{
MobileName
: "Vivo",
MobileModel
: "V5",
MobileColor
: "White",
MobilePrice
: "20000"
};
$.ajax({
type:
"POST",
data:
JSON.stringify(mobiledetails),
url:
"http://localhost:56151/api/Mobiledetails",
dataType:
"json",
contentType:
"application/json",
});
}
Calling
the PUTmobile method using Ajax and updating the data of the Web API.
function
PutData() {
var
mobiledetails =
{
MobileName:
"Vivo",
MobileModel:
"V5",
MobileColor:
"White",
MobilePrice:
"20000"
};
var
t = JSON.stringify(mobiledetails);
var
id = "0";
$.ajax({
url:
'http://localhost:56151/api/Mobiledetails/'
+ id,
type:
"put",
contentType:
"application/json;
charset=utf-8",
data:
t,
dataType:
"json",
});
}
Calling
the Delete mobile method using Ajax and to delete data of the Web
API.
function
deleteData1() {
var
id = 0;
$.ajax({
url:
'http://localhost:32359/api/MobileDetails/'
+ id,
type:
'DELETE',
success:
function
(data) {
},
error:
function
(data) {
alert('Problem
in deleting car:'
+ data.responseText);
}
});
}
Calling
GET by ID from Ajax and getting data from the Web API by id.
function
GetMobileById() {
var
id = 1;
$.ajax({
url:
'http://localhost:56151/api/MobileDetails/'
+ id,
type:
'GET',
dataType:
"json",
success:
function
(data) {
var
datavalue = data;
var
myJsonObject = datavalue;
var
MobileModel = myJsonObject[0].MobileModel;
var
MobileName = myJsonObject[0].MobileName;
var
MobileColor = myJsonObject[0].MobileColor;
var
MobilePrice = myJsonObject[0].MobilePrice;
$('<tr><td>'
+ MobileModel + '</td><td>'
+ MobileName +
'</td><td>'
+ MobileColor + '</td>'
+ '</td><td>'
+ MobilePrice + '</td></tr>').appendTo('#Mobiletbl');
},
error:
function
(xhr) {
alert(xhr.responseText);
}
});
}
After
completing all the functions of Ajax I am now displaying the view
“MobileStock”.
Final
Output
Here in this view I have consumed a Web API for Demo.
Here in this view I have consumed a Web API for Demo.

No comments:
Post a Comment